//
Learn more about electronic music production: How to mix and Master Audio to get better sound quality for Techno
and House Music. If you are during the mixing process there are many possibly mistakes you can make. Read the following blog post to solve some of your mixing problems as a
SoundCloud producer.
I help you to optimize your sound, here you get music SoundCloud producer tips and mixing tutorials. Because there can be many problems that you can easily optimize.
So that your music sounds even better in the future – Because your Music deserves brilliant sound
Mastrng.com Spotify Playlist
1. Better Room Acoustic & Treatment
Studio Monitor Placement

Studio monitor positioning: How to place your speakers in your music production studio
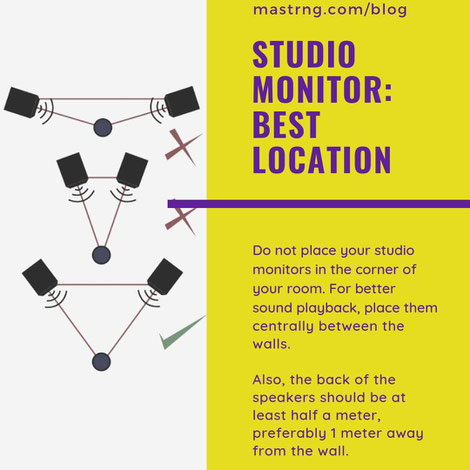
- Don’t put your Studio Monitors in the corner of your Room
- Distance to the wall? Try to keep a meter distance between the wall and your studio monitors.
- Why? Because you could hear to much bass while mixing your songs.
- Position your speakers in the middle of the room so that the distances to the wall to the left and right are equal.
- Positioning along the longer or shorter wall in your room? If possible, if your room is rectangular, place your speakers along the short wall
- Studio Monitor alignment: Try to form a triangle. The distance between your speakers should be 1m / 1.5m. Next, place your studio monitors in an oblique position. So that the tweeters of your
speakers are directed in the direction of your ears. This creates distances like a triangle: The distances between the speakers, and between the speakers and the listening position are equal.
Learn more about some of the best Studio monitors
Source: Studio
Monitor illustration
//
acoustic treatment in a recording studio
Do you feel that all the problems can arise and have to be considered and solved? Unfortunately, you don’t learn to mix in a few weeks, it takes much practice and getting used to your
monitor speakers and the room in which you produce. To make the right decisions while mixing your songs, one crucial point is to optimize your room acoustics. This includes the positioning of
your speakers and the installation of absorbers, bass traps, and diffusers.
If the room is not optimized, your $10,000 speakers can also sound very bad. Flattered Echoes in the room should be reduced by installing objects in your room (plants, cupboards, sofas, etc.).
Also, bass resonances should be dampened through acoustic treatment as well. Be aware that your speakers should not be placed in the corner of a room, consider placing them centered between the
walls. The distance between the loudspeakers and the back wall should also be at least 50cm. Otherwise, your monitors may sound far too boomy, and you have problems mixing the low-end
correctly
Room Equalizer: SonarSoundCloud reposts True-FI and Reference
A useful tool to make your monitor speakers sound as flat and realistic as possible is Reference from SonarSoundCloud reposts. The weaknesses and strengths of your speakers and the room acoustics are measured by test tones, with a microphone. The
measurement result or the frequency curve is then combined with an equalizer and routed between the DAW and the sound card. Frequencies that are too weak are raised, and frequencies that are
too present will be tweaked and lowered.
In any case, I was stunned and positively impressed. Your monitors can sound almost like a new pair of speakers.
But most importantly, it helps you judge your mixes more accurately. The same software is also available for headphones to make them sound flattered and more balanced. Read more on
the SonarSoundCloud reposts True-Fi page and think about
optimizing you Studio. You will not regret it!
//
2.Music production Gear
Best USB Audio Interfaces for under $ 1000
- Audient ID22
- Antelope Audio Zen
- RME Babyface Pro
- Focusrite Scarlett 2i2
- UAD Apollo
- TwinKeith McMillen K-Mix
- DiGiGrid D
- Motu Microbook IIc
- Presonus Studio 26
- Steinberg UR22
- MK2Apogee Duet
Best Headphones for Mixing and Mastering 2020
If you plan to use some reference Headphones for mixing or Mastering, here are some recommendations
- Sennheiser HD600
- Sennheiser HD650
- AKG 702
- Audio Technica – AD900X
- Audio-Technica ATH-R70 X
- MASSDROP X SENNHEISER HD 58X
- MASSDROP X SENNHEISER HD 6XX HEADPHONES
- Focal Clear Professional
2. Mixing Music Production Tips
LOudness levels Mixing: How loud should you Mix
Here is one of the secrets of the mixing engineers. To avoid squashing, if it doesn’t sound loud enough to your ears, turn up the monitor! If you find that you’ve been forced to apply limiting or
compression just to keep the meters from overloading, then you’ve been going about this backwards. Instead, turn down your individual mix levels several dB, then get rid of any compression you
were using to “protect” the mix. Now your mix is at a lowered meter level, so turn up your monitor gain to arrive at the same loudness. But this time it won’t sound squashed. Leave the monitor at
that position as you continue to mix.
When you mix a 24-bit or 32-bit recording you can make a perfectly good mix that peaks between -3 and -6 dBFS with no loss of quality. So if the mix gets too loud by your ears, then turn
down the elements that are too hot in the mix instead of turning down the monitor again, with no fear of mixing “too low”. In other words, a high monitor gain gives you less temptation to over
compress. High monitor gain does not necessarily mean high monitor output from the speakers. It means that the mix level had to be lower. Your dynamic mix should be sitting within -3 and -6
dB before mastering. So please do not try to ruin your song in the mix stage.

Levels:
Start Mixing your loudest Instrument, after that add the other elements of your mix. Try to not exceed -3 dBFS peak on a peak meter on the highest peak of the mix. Low levels are perfectly
acceptable in a 24 bit or 32 Bit System. Once you see that the highest peak is in the range of, say, -10 dBFS to -3 dBFS, then from that point on, if you can hear it, the low level passages are
ok. Preserve dynamic range! Don’t ruin the mix before the mastering process. If the mix sounds good, then soft passages automatically are not too soft. Of course, if you think a soft passage
sounds too soft in the mixing, then of course try to fix that during the mixing. But these can easily be dealt with and often more efficiently in mastering.
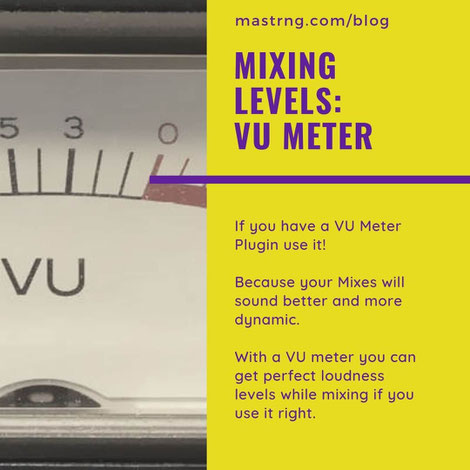
If you have a VU meter, use it. Use the VU, ignore the peak Meter, and you’ll start making better mixes. Because your Mixes will be more dynamic, and you have a better focus what you are
actually doing with the sound. Many DAW’s have a included VU meter, if you don’t have one search for a free VST Meter VST Plugin.
Or download a Free VU meter on this site
*VU Meter Mixing Tip: You can reach the perfect loudness levels with a VU Meter on your Master Channel
Start mixing your Kick, that your Maximum hits about -3/-4VU on the VU-meter
Next add your Bass that your VU Meter reach about -2VU
After you added the rest of your Instruments and all the Drums and Hihats your should have about 0VU on the meter
Thats it, use this as a a starting point. But also use your ears and not just the meter
//
Mixing in Mono reason
Try to mix your song in Mono and do the panning afterward.
If you can get the mix to sound good in mono first, it will sound great in stereo too.
Mixing in Mono is generally much harder, but it’s excellent to improve your mixing skills. You can make better EQing decisions and hear balancing problems of your instruments.
How to save time with a DAW template
Save time and build your own DAW templates!
If you start to produce music it can be annoying to open a blank project. Build a template with your favorite tempo, drums and synth you like to use. Also create groups and channels with prebuild
EQ, compressor, reverb or saturation combinations. This way you can be ready to produce music, as soon as your Daw project is loaded.
This way you can have a go-to sound, that you use for sketching out ideas. So you don’t loose interest making music before you even started.
3. How to use Reverb Mixing Tips
1. Sense of Depth
When mixing, use 3 different reverb rooms (small, medium, large) and create a single send effect channel for each one. Now mix your instruments into the different reverb effect vst plugins.
For example:
- Bass and drums in the small reverb room
- Synthies & Vocals in the middle reverb room
- Effects, Pads and Percussions in the big reverb room
Mixing Tip 2: Pan a Instrument to the right, let’s say 50%. Then create an effect-send channel and use the panning slider and set
it to 50% to the left. Now place a delay and reverb vst plugin in the effect-send channel. Now send your instrument, which is panned to 50% to the right, into the effect channel.
Your instrument will be routed through the delay and reverb plugins and the sound will be much wider. Work with the Wet / Dry regulator to optimize the effects, because less reverb effects is
sometimes more.
2. Bass and Reverb
To produce a clear bass that still has reverb and spatiality, no reverb should be on the sub and low frequencies. Make sure that the reverb is only activated from 100-300hz. Everything under the
frequencies should be a completely dry audio signal.
If your reverb does not include an equalizer, you need to create a send effect channel. Next send your bass to the effect channel. First you use an equalizer in the send channel. With this you
make a low cut for the low frequencies of the bass. Then you can add the reverb and hear a better result. Now mix the dry signal with the low cut reverb from the send effect channel. Mix
these two tracks until you get the best result.
Also try to tame your bass and Reverb using one or more compressors with a slight gain reduction of 3 to 5 db. The ratio can have an average value of 4:1 or 8:1. Your attack time should not
be too short, as the attack phase of the bass should not be compressed. Test attack values between 40ms and 150ms.
Also the choice of the compressor is not unimportant for the final result, try an opto compressor for a soft groovy listening experience. *Tip: use the same compressor with the same values a 2nd
time on your bass = Tighter Sound
3. Contrary Mixing with Reverb
When you use Reverb on your mix, try to create contrast to make your mix sound more interesting. For example, use small rooms for vocals and large rooms for one of your instruments.
Or try the other way around, be creative and test how you get interesting results. Play with the Pre-Delay and Dry / Wet controls to make the sound sound closer or further away.
You can also bring life into your mix by automating the reverb as it changes during the track. Give less or more reverb in the individual passages of your song, by that I mean hook/chorus, bridge
and verse.
4. reverb Settings for Vocals
Here are some vocal reverb mixing tips. Often less is more, also when mixing reverb and vocals. Don’t give 100% of the wet signal when using the Dry/Wet settings, but choose values that make
the reverb less audible.
Be sure to use the pre-delay function on your reverb settings, this will cause your vocal reverb to start a bit delayed. Try pre-delay setting between 50ms and 120ms, but listen for
yourself and find the best way. The result is a cleaner result when mixing to prevent muddy sounds.
Another mixing tip for reverb on vocals is to use the lowcut or low-shelf filter on an Equalizer. Play with your reverb settings and try to lower frequencie values between 200hz and 800hz and
hear how it sounds best.
If you want Soundcloud promotion real your reverb to sound really wide, it usually makes sense to use a delay. With a reverb effect you can send your vocal track into the background quite fast. But mostly vocals should
sound very direct and close during mixing.
5. Creative reverb mixing techniques
To creatively use reverb effects and create a unique sound you can combine your reverb with other plugins. Try a chorus effect before reverb or a saturation effect after reverb to make your
reverb tail sound different.
As mentioned above, reverb automation is another way to make your song sound more interesting while arranging. Use the reverb only partially or change the room size at breaks in the reverb
settings.
Maybe you’ve heard of Auto Panning Vst plugins before? So you could let your reverb tail wander and move in the stereo image
reverb before distortion?
reverb or delay?
reverb before delay?
reverb kick
How to get Depth in your Mix
The stereo image and depth of your final product will be determined by your skill in mixdown at using delays, reverberation, effects, and your skills in tracking, how you tracked your
instruments. Try to make a plan beforehand of how your soundstage might look, where the instruments might be placed.
More text will follow!
Music Production Apps
Music Production Software
SoundCloud Promotion
Supreme{PR} is a Texas based Organic SoundCloud Promotion Agency with a focus on music promotion streaming platforms like Soundcloud and Spotify. We generate real engagement through our partnerships with the largest promotion Soundcloud reposts. Supreme{PR} provides 100% transparent Soundcloud promotion services and remarkable customer Soundcloud promotion service. Disclaimer: We offer organic exposure, not miracles. Make sure your songs are professionally produced and mastered.
| Name | Price | Description | Buy |
|---|


